

Before there were companies that made and sold building materials, people made their own paints and plasters.
It was part of common knowledge. And in many cases, these older paint & plaster recipes are superior to what we purchase today. Natural coatings use a variety of non-toxic ingredients to make beautiful, durable, and incredibly forgiving finishes that invite experimentation and creativity. Recipes vary depending on the performance needs and locally available ingredients.


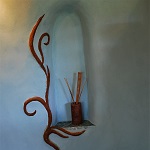
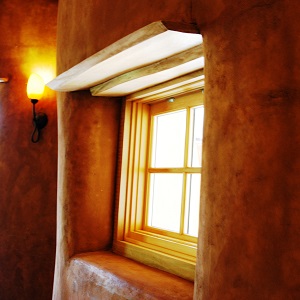
ivory clay plaster & aqua tadelakt (polished lime) over strawbale walls | lime plaster with yellow iron oxide pigment remains durable with weather exposure |
All paints and plaster have a key characteristic in common: they all contain some type of sticky binder. Precisely that stickiness explains why they adhere to surfaces, like walls and ceilings. And the binder is what creates a cohesive monolithic material. The binder is often what gives each natural coating it's name: clay plaster, lime-wash, egg paint, etc.
The difference between paint and plaster is thickness. Paints are micro-thin coatings, while plaster has a measurable thickness. Paints are applied with a brush or roller in thin layers. Plaster is applied with a trowel...like spreading cream cheese on a bagel. Because paints are applied thinly, they are inherently less viscous, while plasters are generally stiffer.
Paints & plasters are coatings, applied over an existing substrate. They are not wall systems. They are not structural. They are coatings. Used to create color and texture. Which makes natural paints & plasters simple to integrate into any building...existing or new construction.
Best Use
Natural paints & plasters are extremely versatile and can be used on new construction or to renovate existing buildings.
There is a natural coating suitable for most common applications...from exterior render to interior finishes...even inside a shower! Natural paints & plasters can be made yourself or purchased ready-to-use. So no matter your project goals, you can incorporate natural finishes!
Cheat Sheet | PAINTS & PLASTER |
BINDERSBinders for paints include: clay, lime, casein (milk protein), egg yolks, egg whites, and more. Binders for plaster include: clay, lime, gypsum, and more. OTHER INGREDIENTSA variety of other ingredients can augment the aesthetics or performance of natural paints & plasters. Such as: pigment, wheat paste, aggregate (sand), mica, chopped fiber, cattail fluff, cow or horse manure, etc. | AT A GLANCEnon-toxic free of petrochemicals less energy to make breathable (do not trap moisture) inexpensive ingredients very doable for novices BEST USEuse in place of conventional paint or plaster (making sure the substrate is compatible with the binder) LINK TO GLOSSARY |

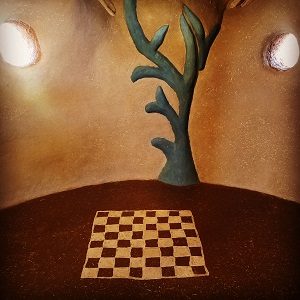


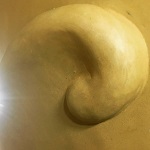
clay plaster over cob walls and clay paint to create a game board on the floor | close-up of tadelakt, a Moroccan method for burnishing and sealing lime plaster |
What's in Paint?
Because paints are applied in thin layers, they do not generally need extra ingredients to give them structure. In other words, paint is made up of just three simple ingredients:
1. Binder: this is the glue that holds the paint together and to the surface
2. Pigment: color added to the paint (this is usually the point of painting)
3. Solvent: whatever is used to thin the consistency of the paint (for many natural paints, the solvent is water)
All three ingredients need to be compatible with each other and with the surface they will be applied to. For example, some binders, such as lime, are highly alkaline and so require pigments that will stay color-stable in high alkalinity. To determine compatibility, simply paint a test area, let it dry, and see if it is easy to peel off.
What's in Plaster?
Because plasters are thick, and many binders shrink when they dry or cure, you need to add aggregate and/or fiber to give them structure and to mitigate cracking. This means you have four potential ingredients to play with, and endless possibilities on what you create with them.
1. Binder: this is the glue that binds your plaster to the surface and creates a cohesive material
2. Aggregate: fine or coarse construction-grade sand that gives the plaster structure, strength, and shrinkage control
3. Fiber: an integral web of fiber inside the plaster provides resistance to cracking and allows plaster to defy gravity (and be applied thickly)
4. Pigment: color added to the plaster
All ingredients need to be compatible with each other and with the surface they will be applied to. The specific ratios of each ingredient depends on the binder, how thick your application is, and your application technique. So testing is essential to find a recipe that is suitable for your particular situation. Additionally, plaster is applied with a trowel, which means you can use your tools to create any variety of finish textures in the surface...from rough to polished smooth.
Benefits | Challenges |
|
|
PERFORMANCE


HEALTHThe single biggest benefit of using natural paints & plasters is that they use non-toxic ingredients. (Unlike commercial paints that can contain carcinogens, respiratory toxins, neurotoxins, and other nasties.) This is especially true if you make your own natural paints & plasters. Then you control every ingredient. DURABILITYOne misperception is that you compromise durability with natural finishes. This couldn't be farther from the truth. In fact, most of the oldest buildings on earth still only have the original artisan-made paints & plasters. So natural paints & plasters can last centuries if made & applied correctly. Additionally, most natural finishes can be sealed with breathable clear sealers, such as hardening oils or beeswax paste, which increase the hardness and/or washability of the surface. RELATIVE COSTSIngredients for natural paints and plasters cost less than commercial products. The list is simple: clay or lime putty, sand, maybe some pigment. The total material cost to paint an average room is around $15. To plaster an average room, the material cost is around $40. Natural plasters provide additional potential cost reduction in the form of energy savings. Thick plasters add uniform mass to the interior of a space, which helps to reduce temperature fluctuations inside. Less fluctuation translates into less heating/cooling time. Additionally, clay has the ability to regulate humidity, which improves comfort and reduces the need for air conditioning. (See also "humidity control".) PESTSPest/bug infestations are absolutely not an issue with natural paints & plasters. The cured paints & plasters do not contain any food source nor do they create a suitable habitat for bugs. | FIRE RESISTANCENatural finishes are not inherently flammable. Plasters in particular are akin to a stone finish in terms of flammability. In code-speak, they are designated as "non-combustible materials" in accordance with ASTM E136. Natural paints & plasters do not foster smoke development in a fire. Nor do they release toxic chemicals in case of fire (because there are no toxic chemical ingredients). Plasters do not change the fire resistance of the wall itself, However, a thick plaster finish slows the transfer of heat through a wall. By thickness, 1/2" thick plaster slows fire development by 1/2 hour, 1" thick plaster slows by 1 hour, etc. HUMIDITY CONTROLAny material that stays persistently damp can support mold growth. And any biodegradable material that remains damp will begin to decay in place. Clay plasters in particular are hygroscopic. This means they tend to absorb moisture when an excess is present. In your space, this means clay plaster will absorb moisture out of the air any time the relative humidity exceeds 50%. It then releases the humidity when the air is dry (less than 50%). Thus clay plaster regulates the humidity inside a space, keeping you comfortable. The example I like to share is this: When you take a hot shower in a conventional space, the steam condenses on any mirrors, fogging them up. In a bathroom that has clay plaster walls, the mirror does not fog up from your shower. Note that the clay is not getting wet! The humidity absorption/release is never felt as a change in the dampness of your plasters. The clay can absorb gallons and gallons of water without any perceptible change to the surface of your walls. SIMPLICITYThe ingredient list is short: 3 for paint & 4 for plaster. This means getting started is fast & unintimidating. And playing with the infinite possibilities is inevitable... |


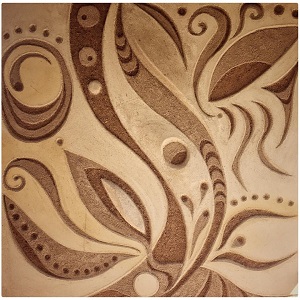

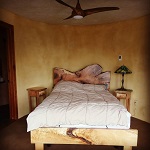
smooth, tactile, durable, healthy clay plaster | different layers of clay plaster carved to reveal depth & design | clay plaster made from soil dug out for the foundation |
What Can I Plaster?
Natural plasters can be applied to nearly any substrate. What you need are 3 characteristics for your wall:
Rigidity - this means the wall surface does not flex or flake, and does not show signs of movement cracks. A wall that is not rigid results in cracking plaster. If the wall is highly flexible, you will need to add rigidity. If there is any material that is flaking or dusting, it needs to be removed, and any holes would be patched. And if there are movement cracks, the structure should be stabilized before plastering.
Texture - this means you need a lot of surface area for the plaster to interface with, because the plaster is heavy and needs a gripping surface to hang off the wall. Texture can be as simple as applying paint with coarse sand in it (if your plaster will be thin). Or it can be wooden lath that is spaced to create a grip for plaster to key in to.
Absorbency - ok, this on is technically optional, but it's highly beneficial. An absorbent surface allow small amounts of binder to actually pull into the wall substrate. This creates an even stronger bond between the plaster and the wall below.
Then test your plaster on the surface you want to apply to. This way you can ensure the plaster is compatible before you commit to a large area. And don't forget to dampen your wall before plastering if it is absorbent!
Examples of surfaces compatible with clay or lime based plasters: wood lath, drywall with sandy paint applied, strawbales, clay walls, unpainted concrete or block...and on and on...
Other Fun Stuff
My niece is a project girl, through-and-through. Once when she came to visit, we pulled out some milk and set it in the sun to curd. We strained the curd and added water and pigments and voila! we had made milk paint. With a small collection of pigments, she could mix any color her heart to dream up. I think we spent 3 hours painting at the dining table. And at the end she said "we should do this every time I visit".
And that is the beauty of natural paints. They are easy. Fun. All-natural. Stress-free. Non-toxic. And addictive!
Recommended Reads
Here are my favorite books about natural paints & plasters
(click the cover of the book to purchase)


Natural Paint Book: I love this book! It's like a recipe book for paints. Each recipe has a photo, the recipe, and what the best uses are. | Natural Paint Decorator: This is the exact same book as on the left...different title & cover, exactly the same inside. | Essential Natural Plasters: What I love best about this book is that it explains the science behind different plasters. | Clay & Lime Renders: Excellent guide to making and applying natural plasters for your strawbale home...plus it includes lots of process photos. | Building with Lime: I call this my lime bible. It demystifies the science behind what lime is, and how to make quality plasters, paints, and mortar. |
Commentaires